Purchasing and setting up One-Page Website
Last Updated: December 01, 2023
This guide will cover how to purchase and set up your One-Page Website one-page website for the first time. You'll start by purchasing the product if you haven't already:
How to purchase One-Page Website
- Head over to the Website Builder landing page.
- Feel free to review the information then click the button Get started on your site.
- Type in your name, your business's name, or some relevant keywords and hit search to view a list of available domains. Make your selection by clicking Add to Cart button.
- Once added to the cart, click the Checkout button or simply click the Cart in the top right-hand corner to proceed to checkout.
How to set up One-Page Website
Once you've purchased your One-Page Website bundle, you will automatically be presented with the setup screen. If you click away from the screen or want to complete it later, you can always return to the setup screen by clicking User icon (![]() ) and then One-Page Website.
) and then One-Page Website.
- The first step is to choose a template. Click on the template picture you find most appealing.
- Next, you will be asked to enter a few details, such as your name, email, address, and whatever else you'd like to add. An example is located on the right-hand side of the page to give you a better idea of the formatting. You can add as much or as little information here as you'd like, and you can always make changes to it later.
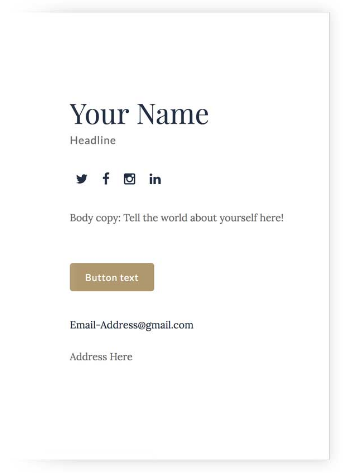
- Your Name - Enter the name you wish to appear on the website. The name will be in big letters at the top of the page.
- Headline - The headline will be located under the name in a smaller font.
- Body Copy - The body is where you can enter the body of your content. This is a larger section and is perfect for descriptions.
- Button Text - This will be the text of the button presented on your page. Clicking the button will take the viewer to the attached link, explained below.
-
Button Link - When the button is clicked it will take your visitor to the provided URL.
-
Forwarding Email - One Page Website comes with a forwarding email address which you'll create in this section. This is a required field since it will be used as your main point of contact on your page. Use something like "yourname", "contact," or "hello" to go to the left of the @ sign.
-
Your Email - The email mask you entered above will forward to the address entered in this field. Make sure to use an email address that you access and check regularly.
-
Address - Enter your physical address if you have a business location or PO box that you wish to make it public and advertise on your page. This field is not required.
- If you wish to add social media buttons, click Add Social Media Links. Here, you can enter the information for your Facebook, Twitter, Instagram, LinkedIn, Pinterest, Google+, YouTube, & RSS.
- Review the information and click the button Save and Add Image.
Note: A notification will pop up saying, "We’re transferring the information you’ve entered to your new One Page Website page. Here, you’ll be able to add a feature image and edit your information. Once you’re happy with how it looks, share your site with the world by hitting Publish."
Click OK, Got it! to proceed.
- You will now be redirected to the one-page website editor where you can add your feature image and make any final changes before you publish your site.
- Once you're happy with how everything looks, click Publish -
 - to make your website go live and appear on the internet for everyone to see. It may take a few hours before the website is fully propagated and works in all parts of the world.
That's it!
