
If you already have a website but want to branch it out a bit, a subdomain is a great way to get the best of both worlds. Whether you’re adding a company blog or selling website merchandise, segmenting your site with a subdomain is a practical solution. Here’s how you can create a subdomain for your website through Name.com hosting.
What is a subdomain?
A subdomain is a domain that is part of a larger existing domain. For example, if your website’s domain is hotpinkcupcakes.com, a subdomain could be blog.hotpinkcupcakes.com. The subdomain name appears before the main domain name or the root domain and can be used to create a separate section of your website.
What can I use a subdomain for?
There are several reasons why you might want to divide your website into distinct sections using a subdomain. Usually, a subdomain is set up when you want to run a site that is parallel to your existing website, but just different enough that you don’t want it to be part of your primary navigation. For example, perhaps you offer B2B business services but want to write a blog. Setting up a subdomain for the blog part of your website divides that specific written content from your product landing pages and white papers. You might also want a subdomain if you are setting up an eCommerce section of your website.
How to set up a subdomain
Let’s say you have a style blog called A Whimsical Wardrobe, and you’ve decided it’s time to start selling merchandise on it. Creating a subdomain for your online store will tie it in with the website while allowing the freedom to create something that stands out.
Step 1: Log into your account
The first step is to log into the cPanel dashboard for the website you want to add the subdomain to. To do that, sign into your Name.com account and press Web Hosting. Press the cPanel Login button to be taken to your cPanel homepage.
![]()

Step 2: Add the subdomain
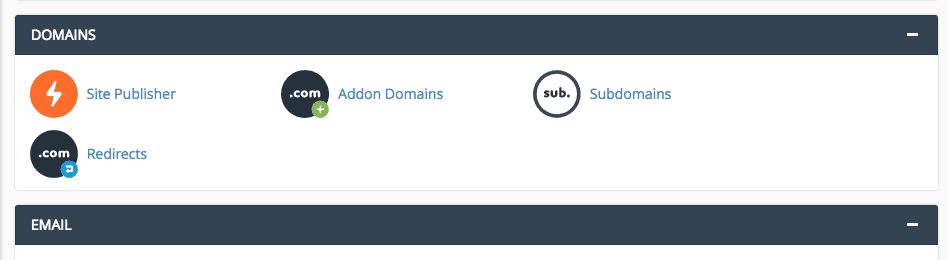
Now, scroll down to the Domains heading and press the Subdomain button.
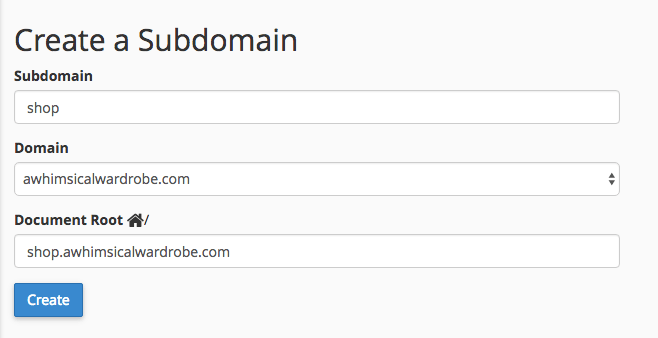
In the Subdomain section, you’ll enter the string you want to the left of the dot in your subdomain. Once it has been entered, the Document Root will autofill. By keeping that section as-is, anything you add to your normal document root folder will load on that subdomain. Press Create to set up your subdomain.
Step 3: Add DNS records
Your subdomain will not resolve properly if you don’t add the correct DNS records to it now that it has been created. To do that, go back to your normal Name.com account and choose Web Hosting from the My Account menu. Scroll down the page to the DNS Management section, and make sure the website that hosts your subdomain is selected.
Use the drop-down menu on the left to choose the “A” record type from the menu. In the Host field, type the “sub” part of your subdomain. Then, type your IP address into the Answer section, which you can find by scrolling to the top of your page and looking at the Server IP Address. Press Add record once you’re finished.

Step 4: Wait for your subdomain to resolve
It could take up to 24 hours for your subdomain to properly resolve after you’ve added the DNS records, so don’t worry if it doesn’t work right away. With your subdomain successfully created, you can start working on your next project and make your website even better than ever.
If you’re working with multiple domains or multiple subdomains, maintain clarity in domain ownership by keeping clear records of who owns each domain or subdomain. This is important especially if there are collaborators involved to prevent confusion and disputes on ownership rights and responsibilities.
Will my SSL certificate cover my subdomain?
We always recommend using an SSL certificate on your website to offer your visitors a secure browsing experience. However, only certain SSL certificates have the ability to cover subdomains. Once you add a subdomain to your website, you’ll need to upgrade your SSL certificate to one that offers the wildcard feature. When a wildcard SSL certificate in place, it will cover all future subdomains that you add to your website.
Benefits of adding a subdomain
- Improved website organization: A subdomain can help organize your website and make it easier for users to navigate. For example, if you have a blog on your site, you could create a subdomain for the blog and separate it from the main website.
- Better search engine optimization: A subdomain can also help with search engine optimization (SEO). By creating a separate subdomain, you can focus on optimizing the content for specific keywords and phrases, which can improve your website’s search engine rankings.
- Enhanced security: A subdomain can also improve the security of your website. If you have a separate subdomain for a particular section of your site, you can apply additional security measures to that subdomain.
There are plenty of advantages to adding a subdomain – especially as a business owner, solopreneur or basically anyone running a website.
Adding a subdomain to your existing domain is a simple process that can benefit your website in many ways. From improved website organization, to better SEO and enhanced security, a subdomain can help you take your website to the next level.
Dark mode
Let's keep in touch.
You can opt out at any time. By clicking “Subscribe”, you agree that you have read, understand, and consent to the Privacy Policy with regards to the use of your personal data